关于推流服务器简介
简单来讲,是通过推流程序,如OBS,将流媒体推送到推流服务器中,再通过Html5、VLC等方式进行拉流,实现视频播放或是视频直播等功能,此功能在直播平台,视频监控,视频点播诸多领域发挥重要作用。受制于网络内容管制或其他直播平台直播不流畅等众多条件问题,或有时想朋友直播时会出现一些烦琐的事情,自建推流服务器才是最明智的选择。
一、环境选择
本文撰写搭建环境使用的是Windows 10 21H1 x64,由于原版Nginx不自带推流模组,所以本次使用Nginx-http-flv-module和Nginx-http-flv-win64充作Nginx(Nginx-http-flv-win64是Nginx-http-flv-module进行编译后的exe程序,解压后可直接运行)。
此外还有nginx-rtmp-module和已经编译完成的nginx-rtmp-win32版本也可以进行拉流。
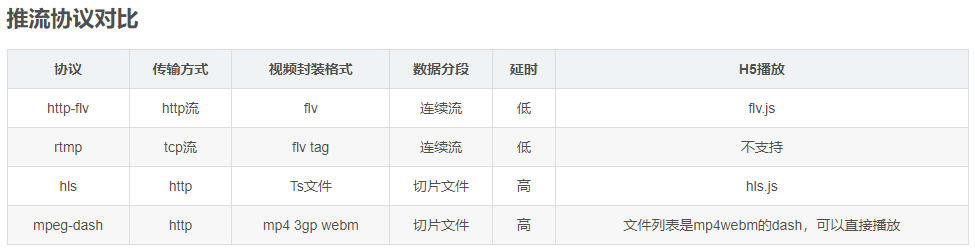
本文选用Nginx-http-flv-module原因是这个版本在Nginx-http-flv-module的基础上增加了flv格式的拉流方式,实现Rtmp Hls Flv Dash等多种方式拉流。
二、下载并修改配置文件
通过编译或使用已经编译完成的文件解压得到Nginx文件夹,在conf文件夹中打开nginx.conf。
来到最下方插入一段代码开启Rtmp和Hls传输协议
rtmp {
       server {
              listen 1935;
              chunk_size 4000; #块大小
              application myapp {
                                 live on;
                                 gop_cache on; #打开GOP缓存,减少首屏等待时间
                                 }
              application hls {
                               live on;
                               hls on;
                               hls_path temp/hls; #切片地址
                               hls_fragment 1500ms; #分段长度
                               hls_playlist_length 3s; #播放列表长度
                               }
               }
}
同时我们还要在Http栏中创建两个目录分别用于缓存HLS和RTMP
location /flv {
               flv_live on;
               chunked_transfer_encoding on;
               }

location /hls {
               types{
                     application/vnd.apple.mpegurl m3u8;
                     video/mp2t ts;
                    }
               alias temp/hls;
               expires -1;
               add_header Access-Control-Allow-Origin *; #解决跨域问题
              }
这样在我们启动Nginx后,使用推流地址rtmp://localhost:1935/hls 密钥随便设置 例如设置1即可实现推流
配置实例
worker_processes  1; #运行在 Windows 上时,设置为 1,因为 Windows 不支持 Unix domain socket
#worker_processes  auto; #1.3.8 和 1.2.5 以及之后的版本

#worker_cpu_affinity  0001 0010 0100 1000; #只能用于 FreeBSD 和 Linux
#worker_cpu_affinity  auto; #1.9.10 以及之后的版本

error_log logs/error.log error;

#如果此模块被编译为动态模块并且要使用与 RTMP 相关的功
#能时,必须指定下面的配置项并且它必须位于 events 配置
#项之前,否则 NGINX 启动时不会加载此模块或者加载失败

#load_module modules/ngx_http_flv_live_module.so;

events {
    worker_connections  4096;
}

http {
    include       mime.types;
    default_type  application/octet-stream;

    keepalive_timeout  65;

    server {
        listen       80;

        location / {
            root   /var/www;
            index  index.html index.htm;
        }

        error_page   500 502 503 504  /50x.html;
        location = /50x.html {
            root   html;
        }

        location /live {
            flv_live on; #打开 HTTP 播放 FLV 直播流功能
            chunked_transfer_encoding on; #支持 'Transfer-Encoding: chunked' 方式回复

            add_header 'Access-Control-Allow-Origin' '*'; #添加额外的 HTTP 头
            add_header 'Access-Control-Allow-Credentials' 'true'; #添加额外的 HTTP 头
        }

        location /hls {
            types {
                application/vnd.apple.mpegurl m3u8;
                video/mp2t ts;
            }

            root /tmp;
            add_header 'Cache-Control' 'no-cache';
        }

        location /dash {
            root /tmp;
            add_header 'Cache-Control' 'no-cache';
        }

        location /stat {
            #推流播放和录制统计数据的配置

            rtmp_stat all;
            rtmp_stat_stylesheet stat.xsl;
        }

        location /stat.xsl {
            root /var/www/rtmp; #指定 stat.xsl 的位置
        }

        #如果需要 JSON 风格的 stat, 不用指定 stat.xsl
        #但是需要指定一个新的配置项 rtmp_stat_format

        #location /stat {
        #    rtmp_stat all;
        #    rtmp_stat_format json;
        #}

        location /control {
            rtmp_control all; #rtmp 控制模块的配置
        }
    }
}

rtmp_auto_push on;
rtmp_auto_push_reconnect 1s;
rtmp_socket_dir /tmp;

rtmp {
    out_queue           4096;
    out_cork            8;
    max_streams         128;
    timeout             15s;
    drop_idle_publisher 15s;

    log_interval 5s; #log 模块在 access.log 中记录日志的间隔时间,对调试非常有用
    log_size     1m; #log 模块用来记录日志的缓冲区大小

    server {
        listen 1935;
        server_name www.test.*; #用于虚拟主机名后缀通配

        application myapp {
            live on;
            gop_cache on; #打开 GOP 缓存,减少首屏等待时间
        }

        application hls {
            live on;
            hls on;
            hls_path /tmp/hls;
        }

        application dash {
            live on;
            dash on;
            dash_path /tmp/dash;
        }
    }

    server {
        listen 1935;
        server_name *.test.com; #用于虚拟主机名前缀通配

        application myapp {
            live on;
            gop_cache on; #打开 GOP 缓存,减少首屏等待时间
        }
    }

    server {
        listen 1935;
        server_name www.test.com; #用于虚拟主机名完全匹配

        application myapp {
            live on;
            gop_cache on; #打开 GOP 缓存,减少首屏等待时间
        }
    }
}